
Stop Over-Complicating Kubernetes: This is How You Should Actually Learn It
From monolith problems to microservice chaos to Kubernetes solutions in plain English

Before talking about Kubernetes, I want to talk about why we needed Kubernetes in the first place by taking you back in time
Software development flashback
In the beginning of IT, life was simple. People simply build applications for a few hundred thousand users.
They built one big application that did everything. They called it Monolith.
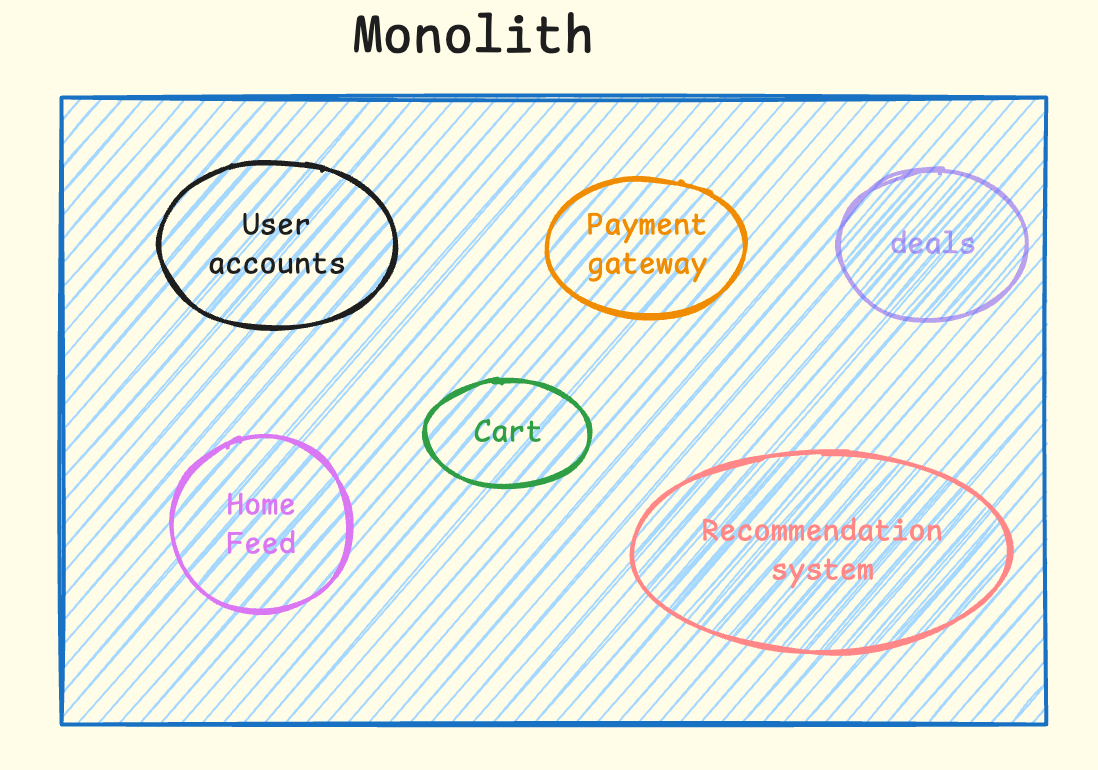
Your entire application in one place. If I take the example of Amazon: User accounts, product pages, recommendation system, shopping cart, and payment system all live in one codebase.
Why monoliths were great
Simple to develop: One codebase, one project, easy to understand
Easy to test: Run all tests in one place, no complex integration testing
Simple deployment: Deploy one application, not 20 different services
Easy debugging: All code is in one place, making it easier to trace issues
No network complexity: Everything talks directly, no API calls between services
But they had some significant problems like
Scale everything or nothing: Need more power for one feature? Scale the entire app
One failure kills everything: A Bug in the payment system brings down the whole website
Technology lock-in: Stuck with one programming language and framework
Team bottlenecks: Multiple teams working on the same codebase cause conflicts
Slow deployments: A Small change requires deploying the entire application
As the internet grew, more and more people started using these applications. And as thousands of users turned into millions and billions, scaling these apps became the biggest problem.
Netflix learned this the hard way
In their early days, Netflix ran everything as one giant application. When they had traffic spikes or when one small part broke, their entire streaming service would go down.
In response to these challenges, Netflix began a strategic transition to a microservices architecture in 2009. By decomposing the monolith into hundreds of independent, loosely coupled microservices.
Microservices: Breaking free from Monolith
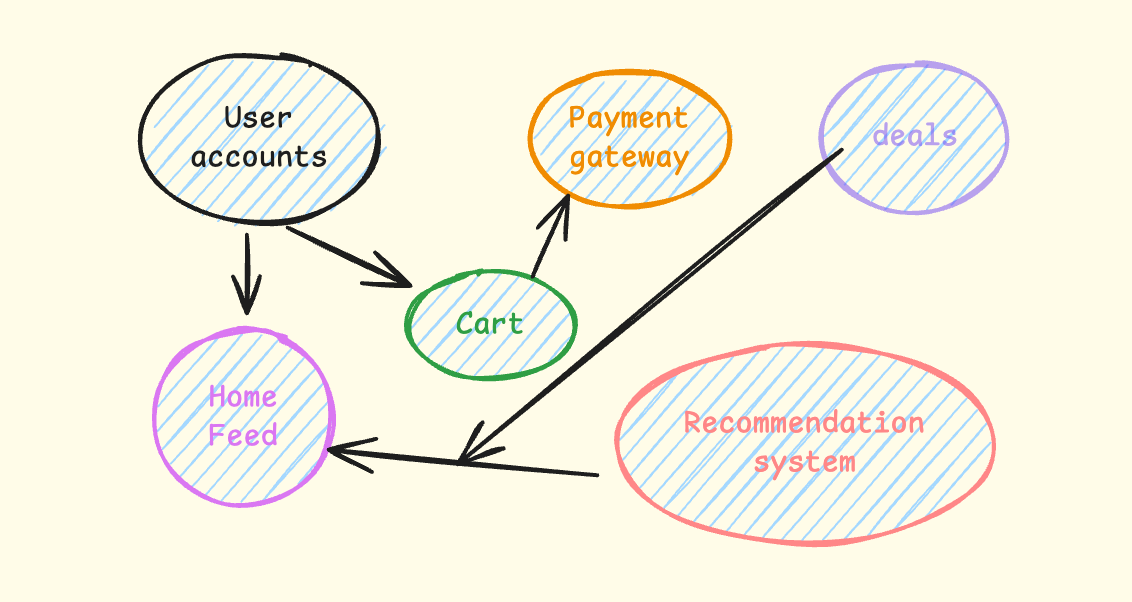
Microservices allowed developers to break huge monoliths into hundreds of services with individual responsibility.
Why microservices were great:
Scale only what you need
Isolated failures while other services are still running
Use Python for AI, Go for speed, Java for APIs
Each team owns its service(build, deploy, manage)
Fast deployments
The problems with microservices:
Hard to manage many services: Deploying and monitoring 50+ services manually
Services keep crashing: No automatic restart when something fails
Difficult scaling: Manually adding/removing servers based on traffic
Complex networking: Services can’t find each other when IPs change
No health monitoring: Don’t know which services are healthy or sick
This is exactly what Kubernetes solved
Kubernetes Solved the Problems We Had with Microservices
Automatic service management: Kubernetes handles deploying and monitoring all your services
Auto-healing: When a service crashes, Kubernetes instantly starts a new one
Automatic scaling: Kubernetes adds/removes containers based on traffic automatically
Service discovery: Services can always find each other, even when IPs change
Health monitoring: Kubernetes constantly checks if services are healthy and replaces sick ones
Load balancing: Automatically distributes traffic across multiple copies of your service
Why Kubernetes took off: Google had been using this approach internally for 10+ years with their Borg system. When they open-sourced Kubernetes in 2014, companies realised they could get Google-level infrastructure management. Plus, it works on any cloud provider, no vendor lock-in.
Companies started adopting Kubernetes fast, and within a few years, Kubernetes gained popularity and became the shiny tool everyone wanted to get their hands on.
Every application doesn’t need Kubernetes, and one shouldn’t use Kubernetes whenever they hear the name dockersized application.
When Should You Use Kubernetes?
Use Kubernetes when:
You have multiple services (more than 5–10)
You need to scale different parts differently
You want zero-downtime deployments
You have a team that can learn it
You’re already using containers
Don’t use Kubernetes when:
You have a simple app with 1–3 services
Your team is small (1–2 developers)
You’re just getting started with containers
Your app doesn’t need high availability
Kubernetes is like buying a Ferrari. Amazing if you need the performance, overkill for grocery shopping.
Before you learn Kubernetes, learn Docker and Docker Compose
Kubernetes Architecture

Kubernetes has two main parts that work together: the control plane and the worker nodes.
Think of it like a company where the control plane is the management team that makes decisions, and worker nodes are the employees who do the actual work.
Control Plane: The Management Team
The control plane has 4 main components:
API Server: The front desk of Kubernetes
This is where you send all your commands
Handles authentication (checks if you’re allowed to do something)
Responsible for writing cluster information into etcd
You can use
kubectlto communicate with the cluster
Controller: The supervisor
Makes sure everything runs exactly as the user asked, like a manager who ensures work gets done properly
Implements a control loop that continually detects cluster state changes (e.g., pods dying) and tries to restore the cluster to its desired state
For example, if a pod unexpectedly dies, the Controller Manager requests the Scheduler to decide which node to spin up the new pod to replace the dead pod. Kubelet then spins up the new pod.
Scheduler: The task assigner
Like a team lead who assigns projects to the right team members
Decides which worker node should run your application by taking into account various constraints (affinity, resource requirements, policies, etc)
Decide which node the next pod will be spun up on, but do NOT spin up the pod itself (kubelet does this)
etcd: The company database
Like the company’s database that keeps track of everything that goes on in a company.
It is the brain of the cluster, and it stores all the cluster data in a key-value database
Application data is NOT stored here, only cluster state data. Remember, the master node does not do the work; it is the brain of the cluster. Specifically, etcd stores the cluster state information for other processes above to know information about the cluster
Worker Nodes: The Workforce
Each worker node has 3 main services:
kubelet: The local manager
Interacts with both the node AND the container
Takes orders from the control plane, starts and stops your applications, and reports back on what’s happening on this node
Container Runtime: The application runner
It allows nodes to run containers (now containerd, earlier Docker)
Kube-proxy: The networking specialist
Handles all networking between applications
Makes sure apps can talk to each other across different nodes
Sits between nodes and forwards the requests intelligently (either intra-node or inter-node forwarding)
You do not run an application on Kubernetes as a container; you run it as a pod. Consider the pod as a wrapper on top of the container. It is the smallest unit in Kubernetes.
Pods: The Basic Building Block
A pod is like a small apartment that houses your application container. Most of the time, one pod = one container.
Pods are temporary by design. When a pod dies, it’s gone forever with a new IP address for the replacement.
Note: In production, we rarely create pods directly. Instead, we use Deployments to manage pods because they provide auto-healing and scaling capabilities.
Deployments: Keeping Your Apps Alive
Deployments are like having a guardian that ensures your application never truly dies. If you want 3 copies of your app running, deployment makes sure you always have exactly 3.
What deployments do:
Keep your desired number of pods running (3 in this example)
Replace crashed pods automatically
Handle updates without downtime
Scale your application up or down
Note: In production, we always use Deployments instead of creating pods directly. Deployments provide the reliability and scaling features that production applications need.
Services: Your App’s Permanent Address
Here’s the problem: pods get new IP addresses every time they restart. How do other apps find yours? Services solve this by giving your app one stable address. Let me use an example.
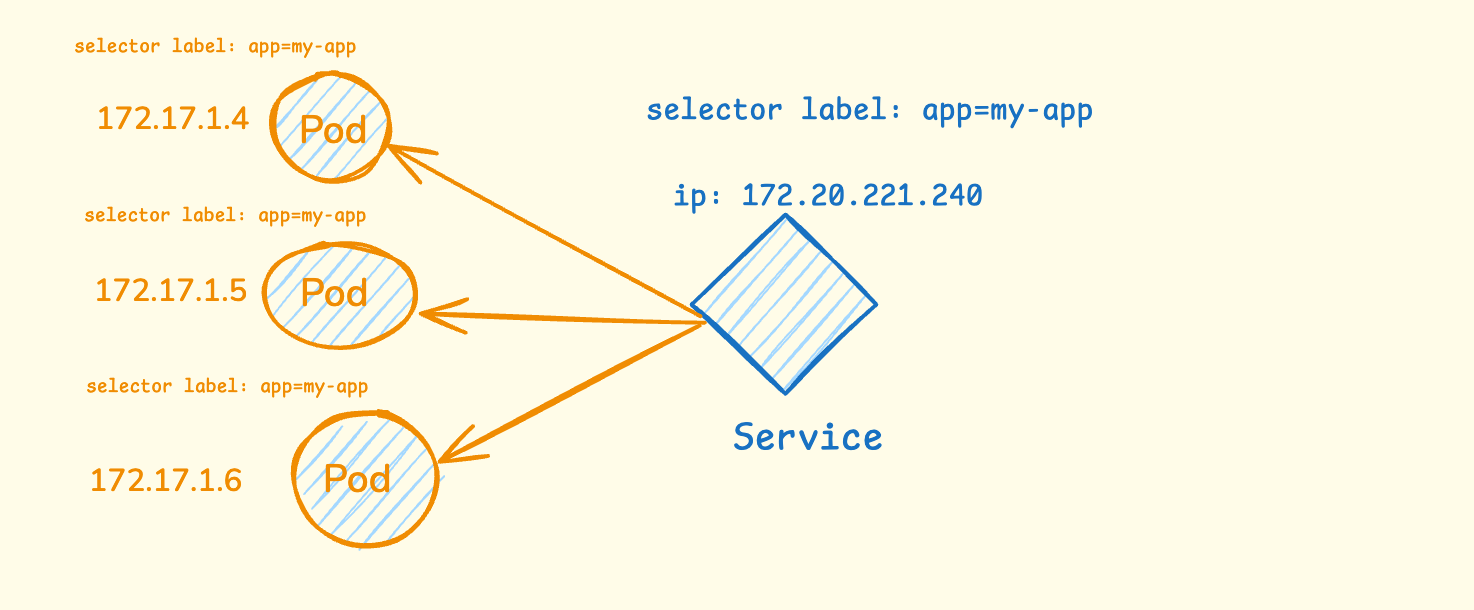
In the diagram above, you can see three pods running with different IP addresses (172.17.1.4, 172.17.1.5, 172.17.1.6). Each pod has the same label app=my-app. When one of these pods dies and gets replaced, it will get a completely different IP address.
The Service creates a stable front door with one permanent IP address (172.20.221.240). It uses selector labels to automatically find all pods that have the label app=my-app. No matter which pods are running or what their individual IP addresses are, other applications can always reach your app through the Service’s stable IP.
The Service also acts as a load balancer. When a request comes to the Service IP, it automatically distributes the traffic across all healthy pods. So if you have 3 pods running, the Service will spread incoming requests between all 3 pods, ensuring no single pod gets overloaded.
Service Types
ClusterIP (Default)
Only accessible from inside the Kubernetes cluster
Perfect for internal communication between services
Most common type for backend services
NodePort
Exposes your service on each node’s IP at a specific port (30000–32767)
Accessible from outside the cluster via
<node-ip>:<node-port>Good for development and testing
LoadBalancer
Creates an external load balancer (works with cloud providers)
Gets a public IP address
Best for production web applications that need external access
Note: In production, we mostly use ClusterIP for internal services (databases, APIs) and LoadBalancer for services that need external access (web frontends). NodePort is mainly used for development and testing environments.
How They Work Together
Deployment ──→ Manages ──→ Pods ──→ Run ──→ Containers
    ↑                        ↑
    │                        │
    └── Controls ─────────────┘

Service ──→ Points to ──→ Pods (using labels)
Deployment creates and manages Pods
Pods run your actual application containers
Service provides a stable way to reach your Pods
When Pods die, Deployment creates new ones
Service automatically finds the new Pods using labels
This three-layer approach gives you reliability (Deployment), isolation (Pods), and stable networking (Services) — everything you need to run applications in production.
Enough with the theory, let me show you how we run applications on Kubernetes.
Running your first application on Kubernetes.
For the demo, I will use KodeKloud Kubernetes playground. You can use other alternatives such as minikube, kind, etc.
Running the first pod
# Create a pod
kubectl run my-app --image=nginx
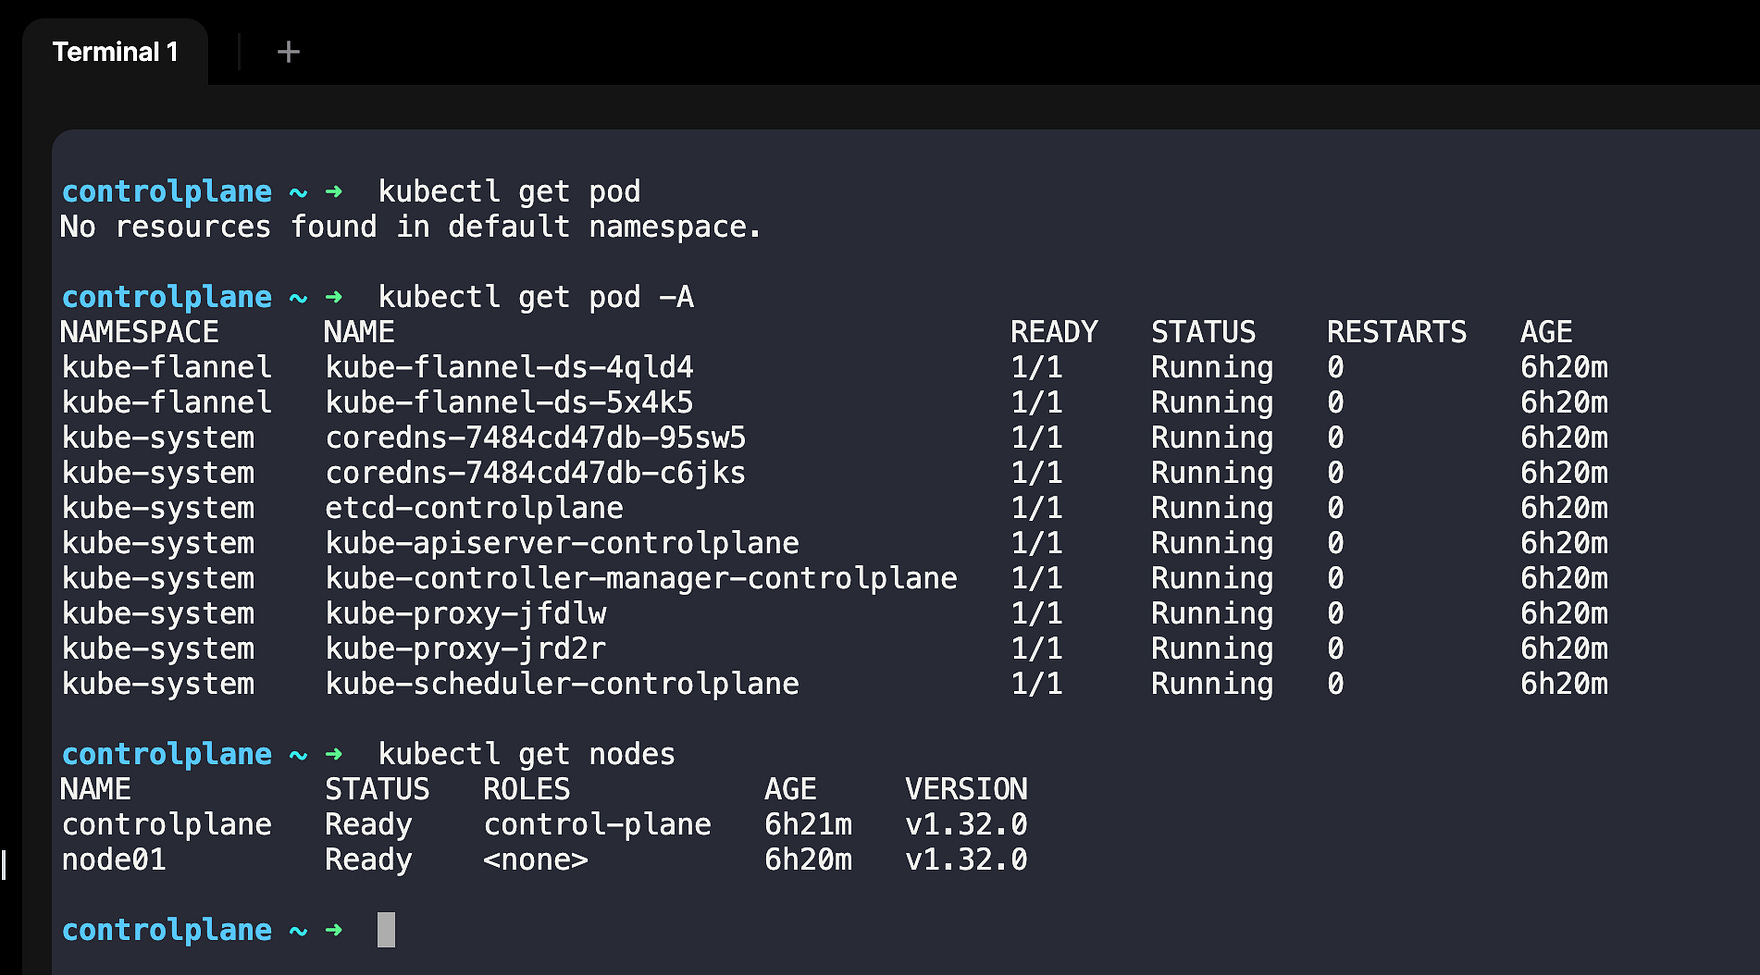
# See your pod
kubectl get pods
# get more details with wide option
kubectl get pods -o wide
# see the ruuning app
curl 172.17.1.2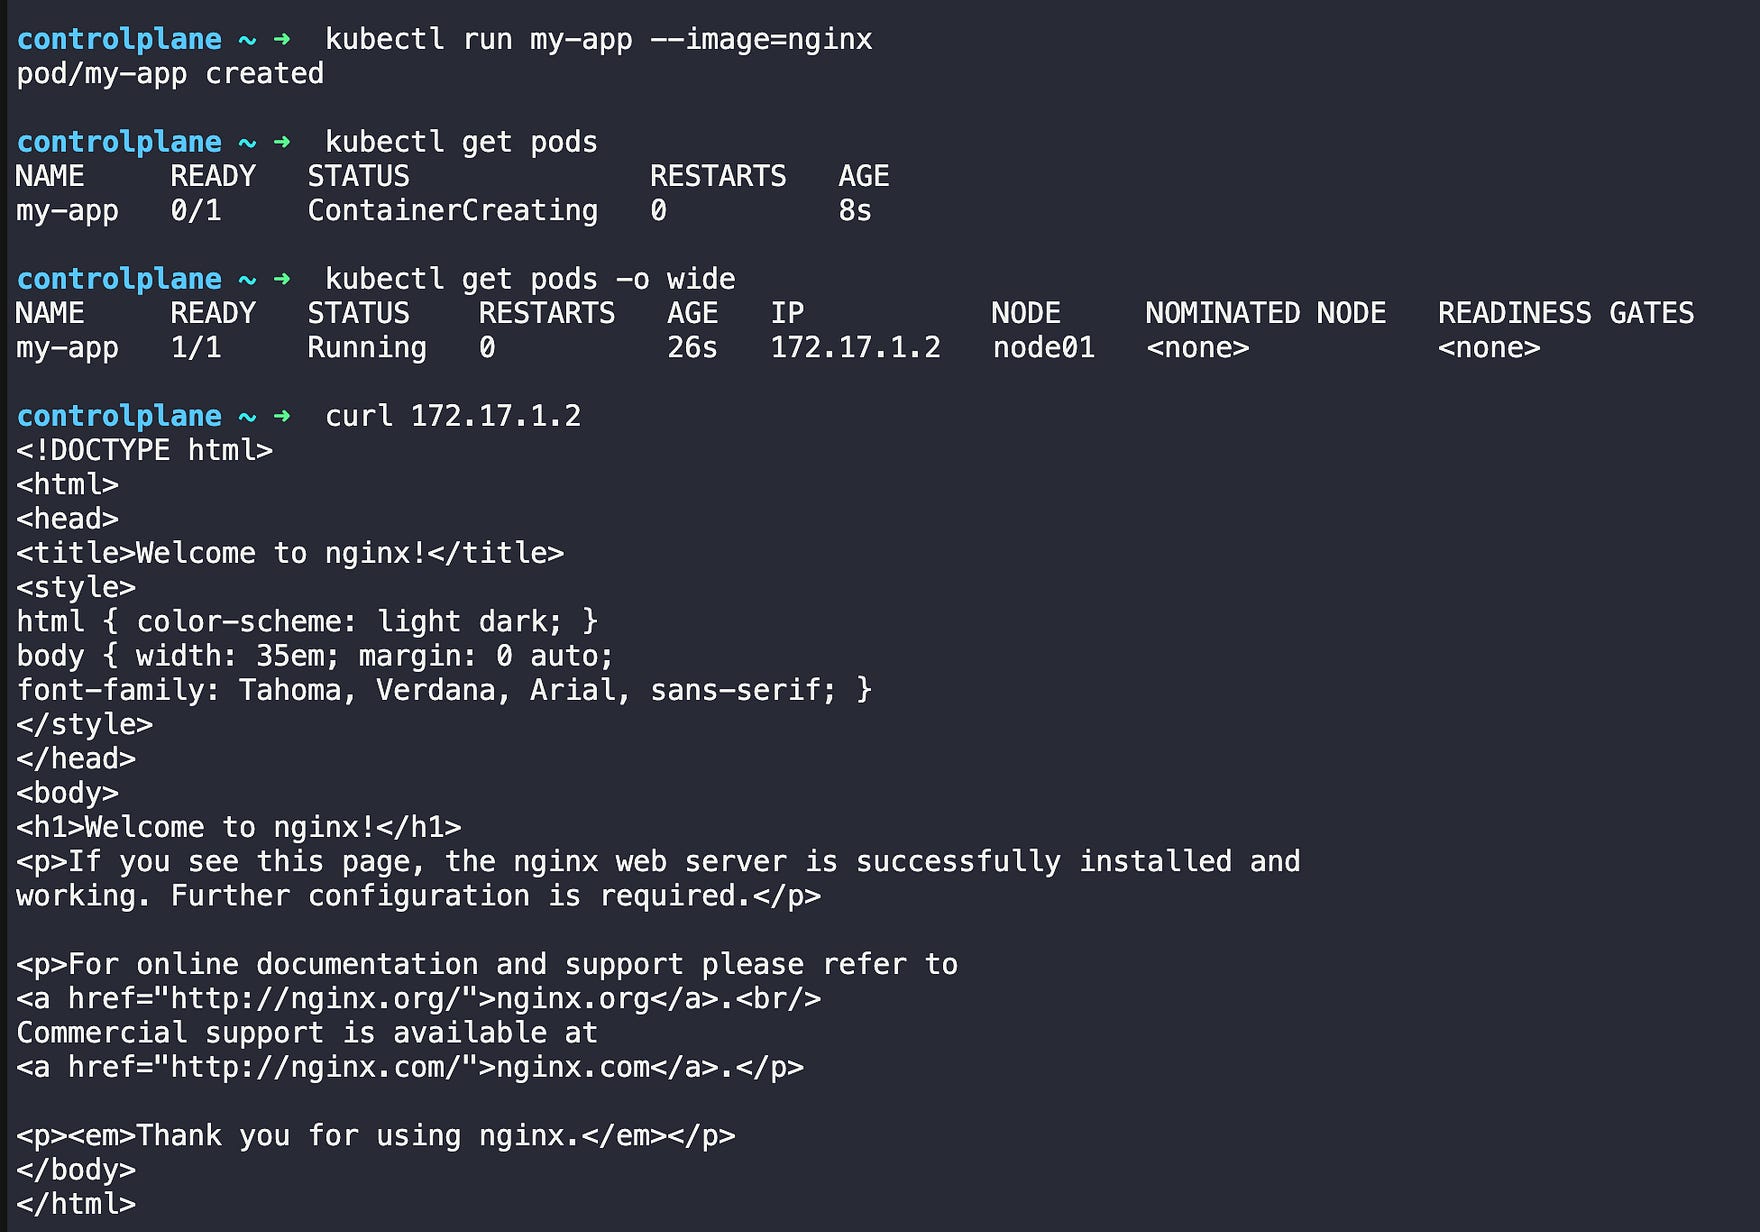
# Check what’s happening
kubectl describe pod my-app

# check the logs
kubectl logs my-app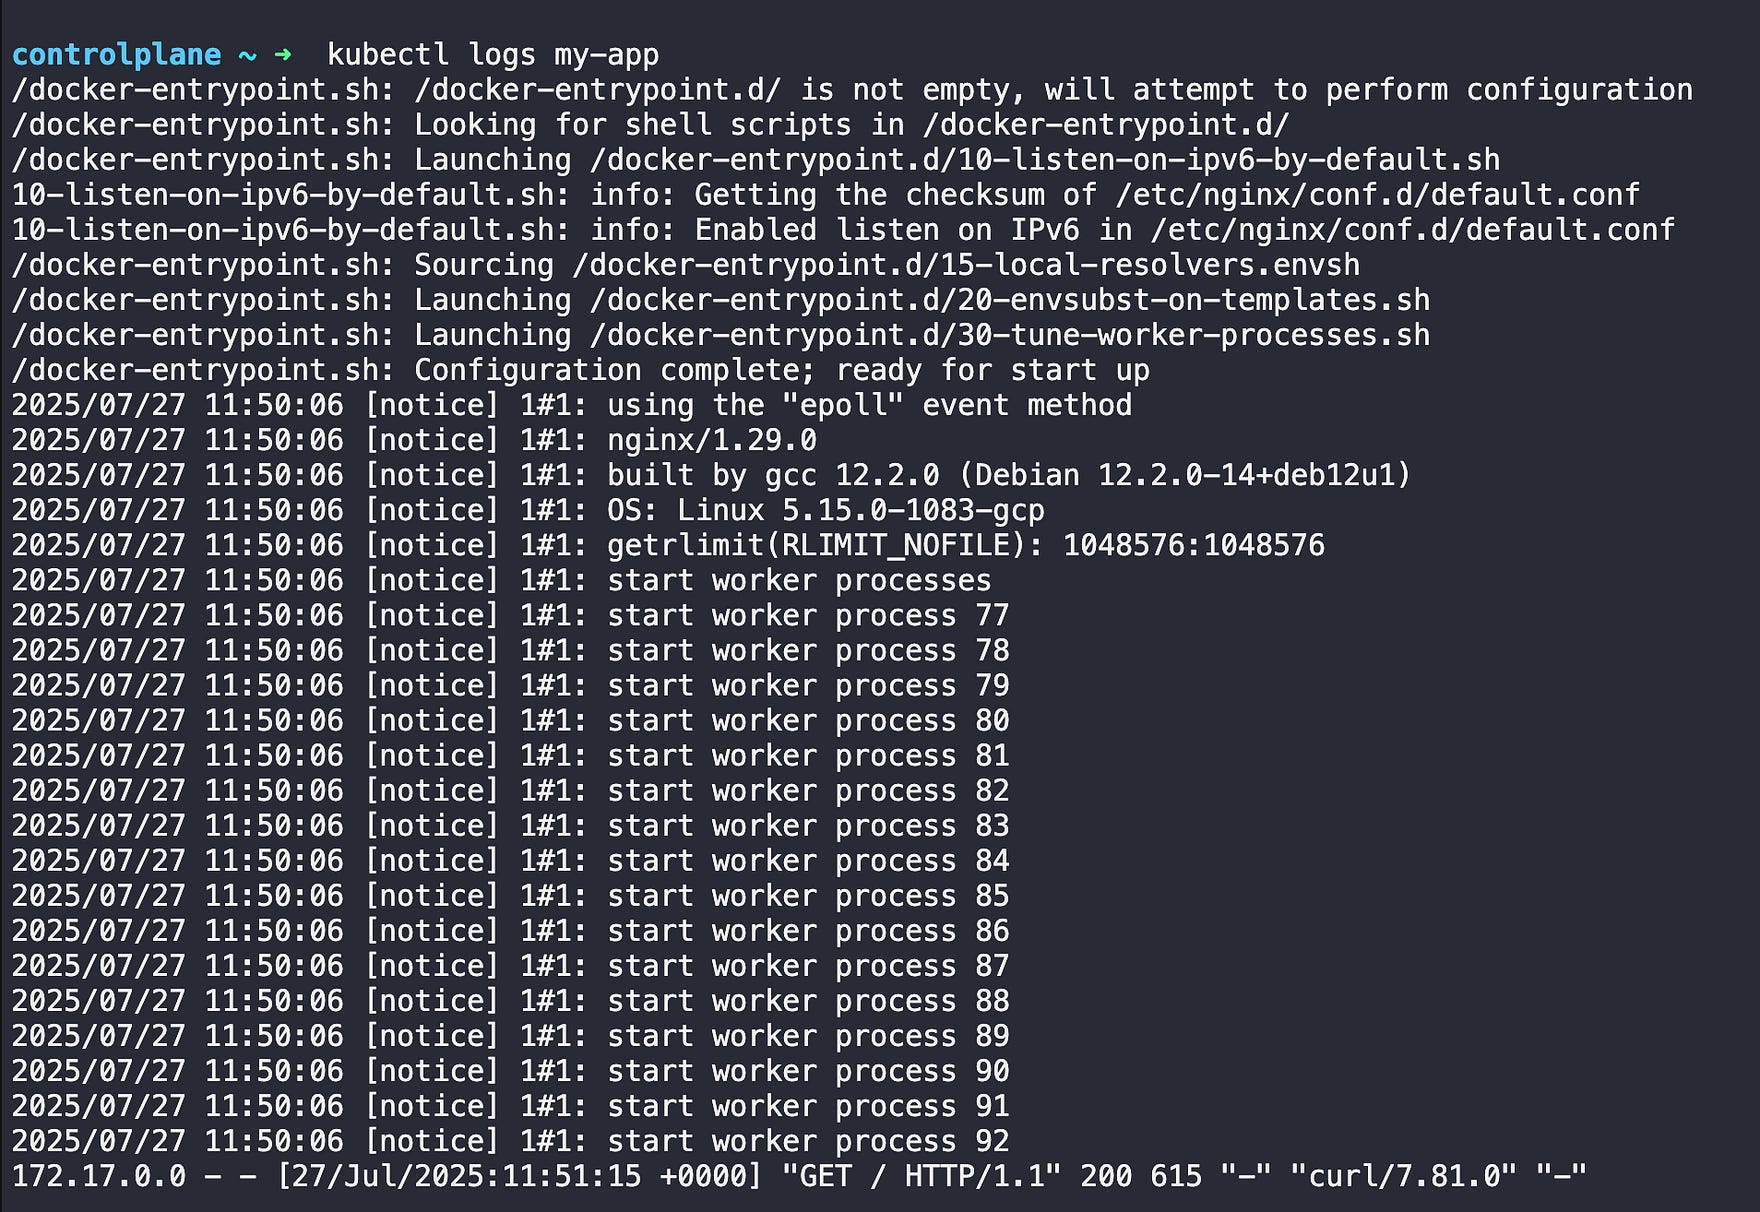
Describe command output
You can check the events.

You can also create the pod using a YAML file
pod.yaml
apiVersion: v1
kind: Pod
metadata:
  name: nginx-pod
spec:
  containers:
  - name: nginx
    image: nginx
    ports:
    - containerPort: 80
This YAML defines a simple pod that runs an nginx container on port 80. The metadata section gives it a name, while the spec section describes what container to run.
kubectl apply -f pod.yaml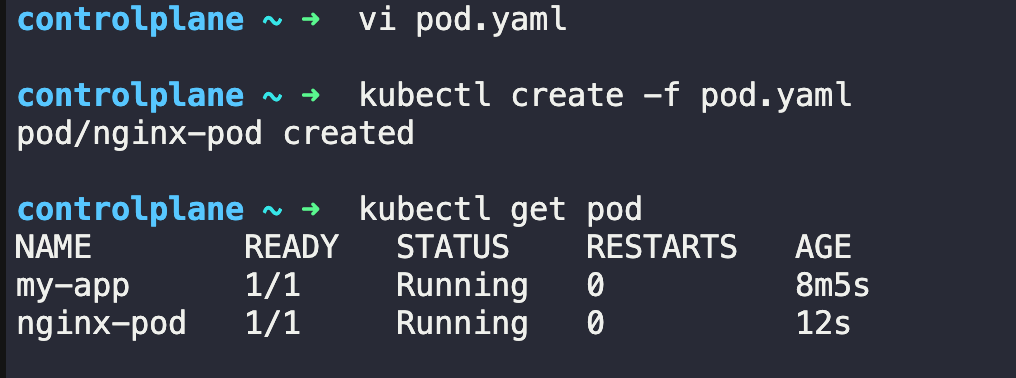
Deleting the pod
kubectl delete pod my-app
kubectl delete pod nginx-pod
Deployment
Deployments make sure your app stays running. If a pod dies, the deployment creates a new one.
deployment.yaml
apiVersion: apps/v1
kind: Deployment
metadata:
  name: my-app
spec:
  replicas: 3
  selector:
    matchLabels:
      app: my-app
  template:
    metadata:
      labels:
        app: my-app
    spec:
      containers:
      - name: my-app
        image: nginx
This deployment creates 3 identical pods running nginx containers. The selector tells the deployment which pods to manage using labels, while the template defines what each pod should look like.
kubectl apply -f deployment.yaml
kubectl get deployment
kubectl get pods
kubectl get pods -o wide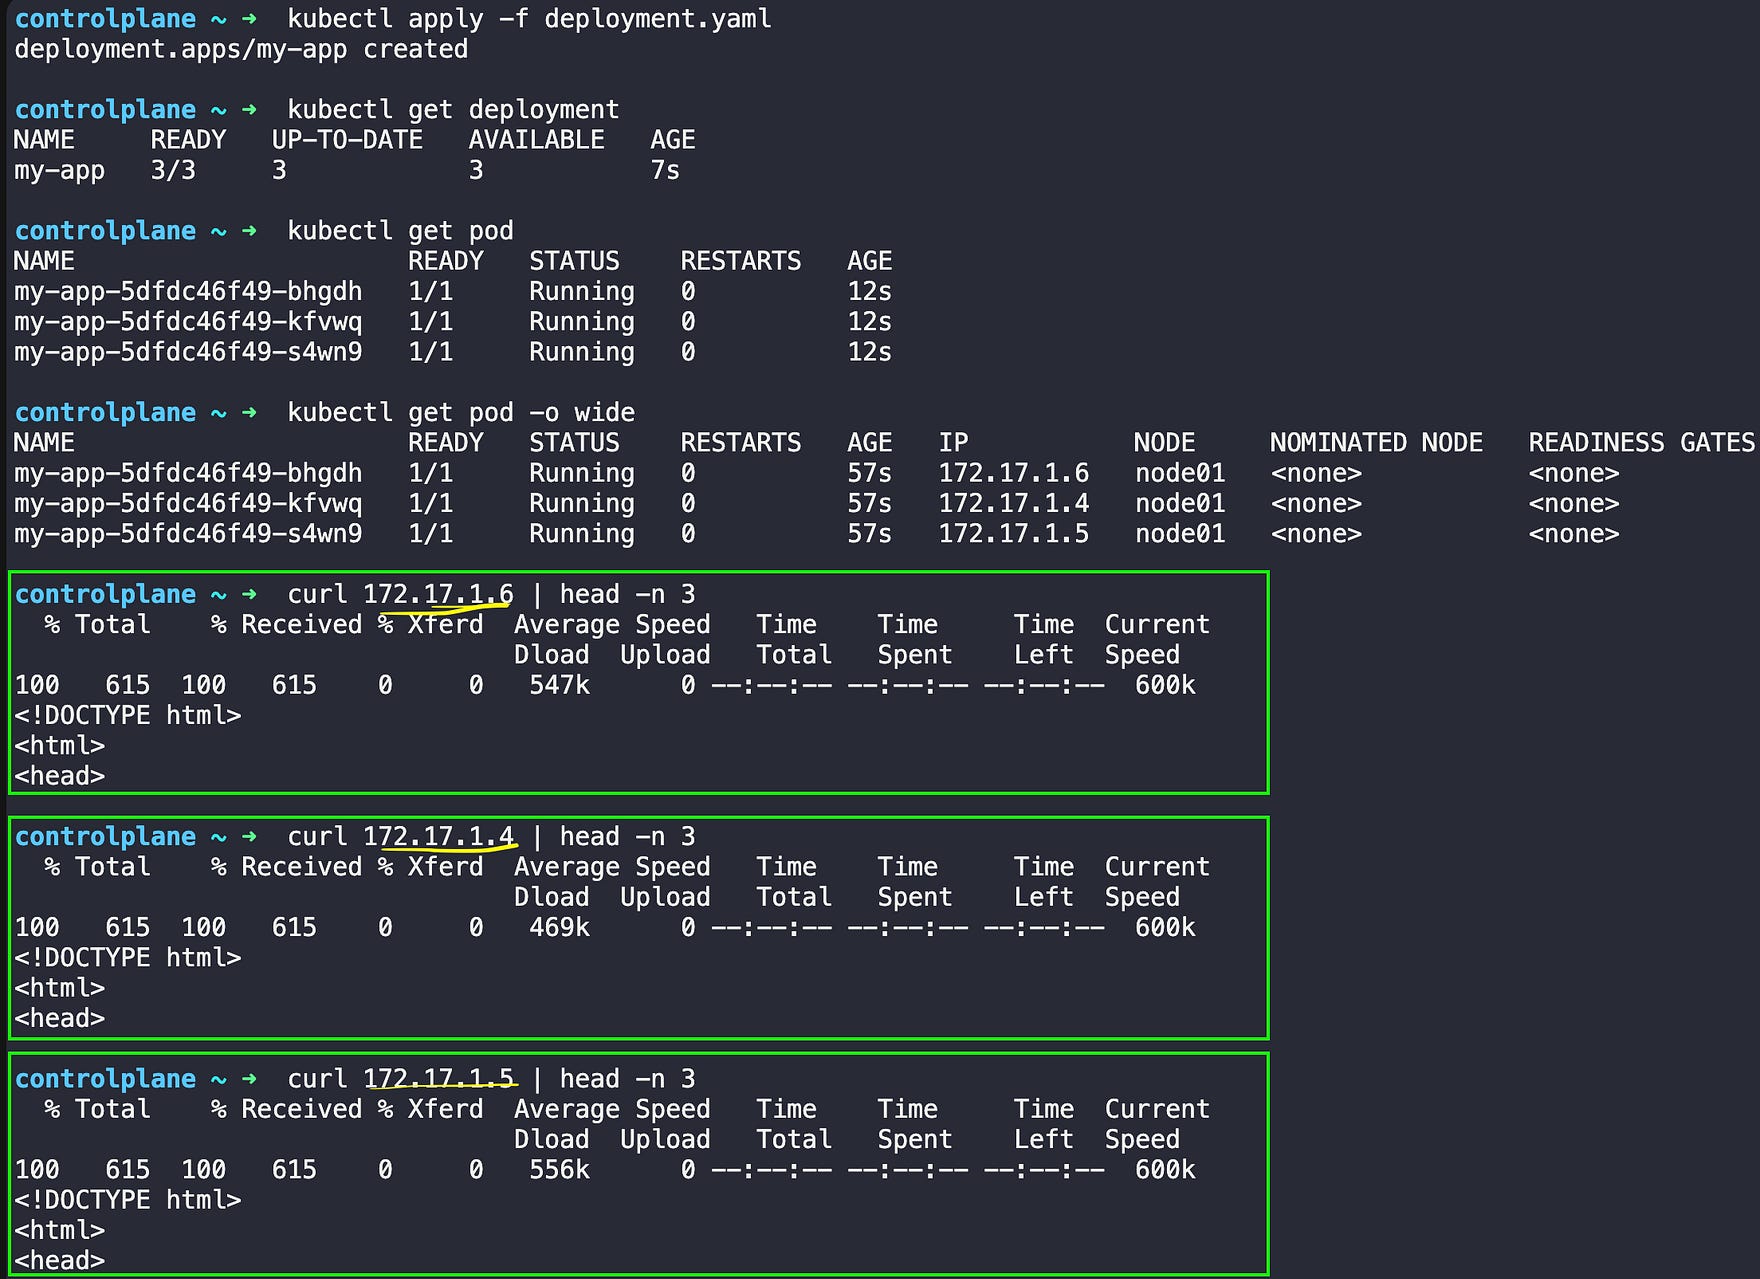
You can try a few more things like
# Test auto-healing: delete a pod
kubectl delete pod <pod-name>
kubectl get pods  # Watch it come back!

# Scale your deployment
kubectl scale deployment my-app --replicas=5
kubectl get pods
Services
Pods get new IP addresses when they restart. Services give you one stable address to reach your app.
apiVersion: v1
kind: Service
metadata:
  name: my-app-service
spec:
  selector:
    app: my-app
  ports:
  - port: 80
    targetPort: 80
  type: ClusterIP
This service creates a stable endpoint that routes traffic to any pod with the label app=my-app. The port 80 is where you access the service, and targetPort 80 is where the pods are listening.
# Create the service
kubectl apply -f service.yaml

# Check your service
kubectl get services

# Test it works (from inside cluster)
kubectl get service my-app-service  # Get service IP
curl <service-ip>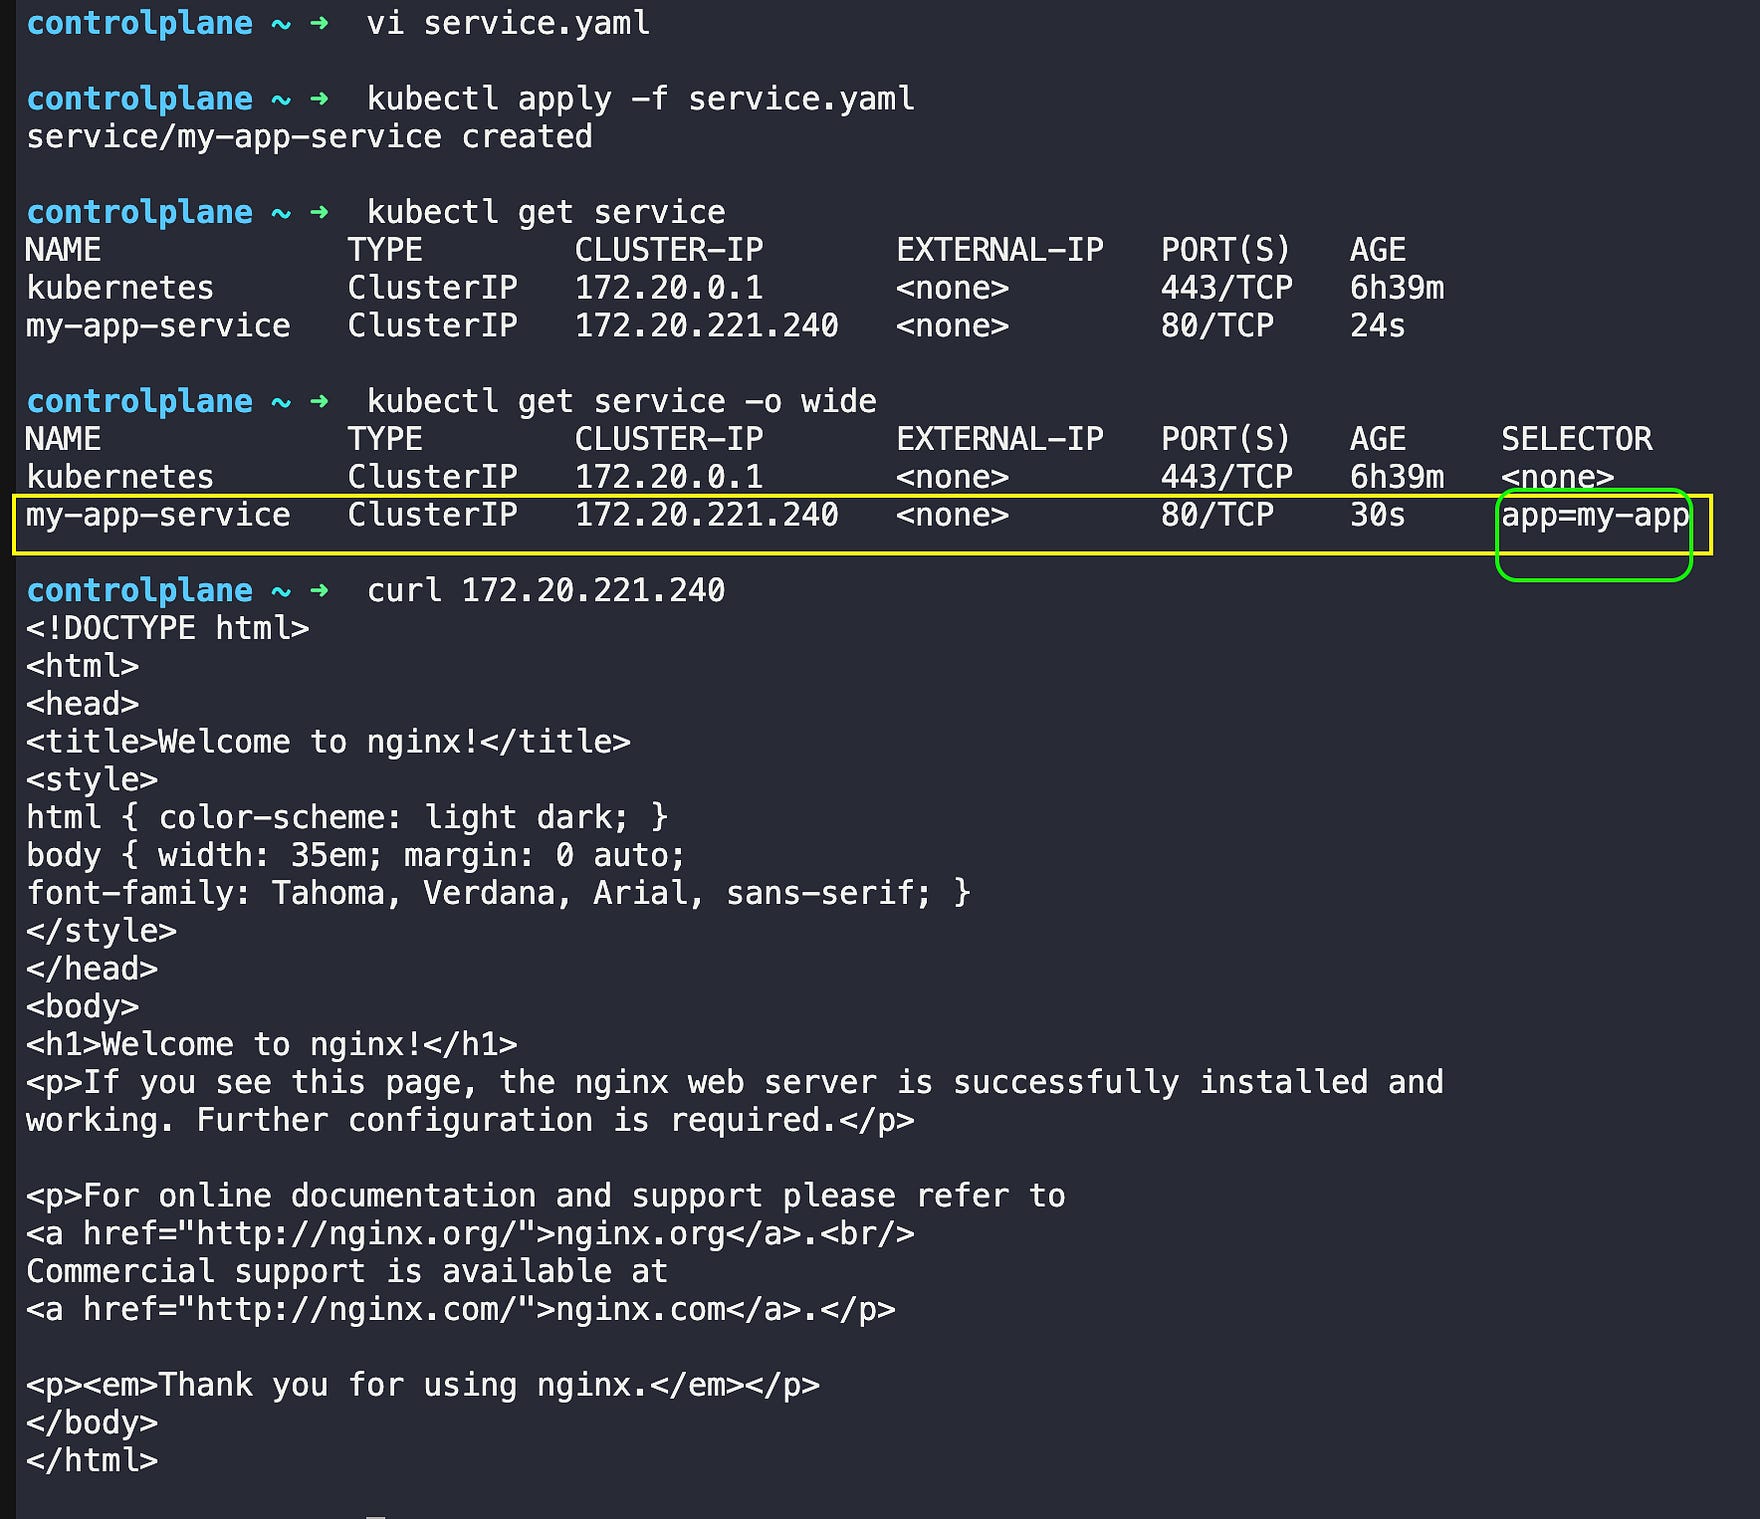
What’s Next?
In this blog we covered the fundamentals of Kubernetes:
Why we moved from monoliths to microservices to Kubernetes
How Kubernetes architecture works — Control Plane managing Worker Nodes
The core building blocks — Pods (your apps), Deployments (reliability), and Services (networking)
But running real applications in production requires more than just the basics. In our next post, we’ll tackle the practical challenges you’ll face when deploying actual applications.
The next one
Building Your First Real Kubernetes Application (Not Another nginx Demo)

In the first part of the Kubernetes blog series, we covered why Kubernetes exists and how its core components work together. We learned about pods, deployments, and services through simple examples.
Hi Sir,
I enjoyed it alot.
Learning Kubernetes. Done with practicals.
Thanks for sharing the journey from monoliths to microservices to K8s.